Favourite Photos...

Favourite Photos...
Reading Lines GP35 #3647

Middletown, Pa

Wednesday 1 June 2022

RDG - FWd Flatcar...

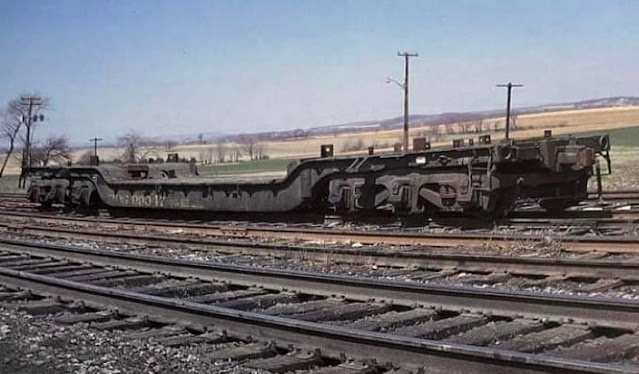
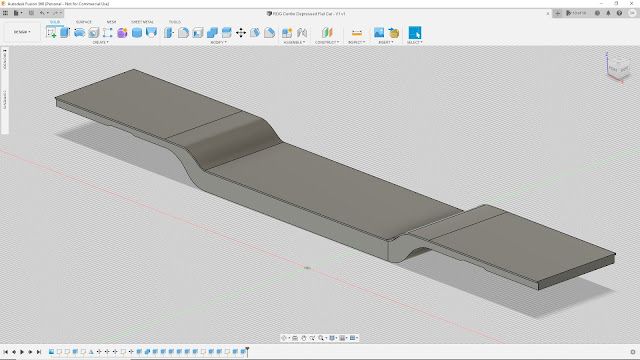
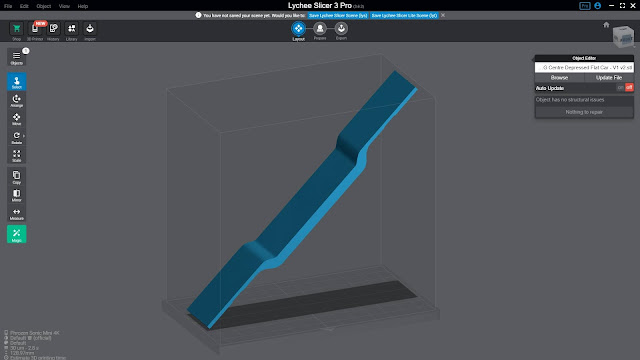
Ok I’m calling the design & the first complete prototype of the Reading (RDG) - FWd Depressed Centre Flatcar (HO Scale) done.

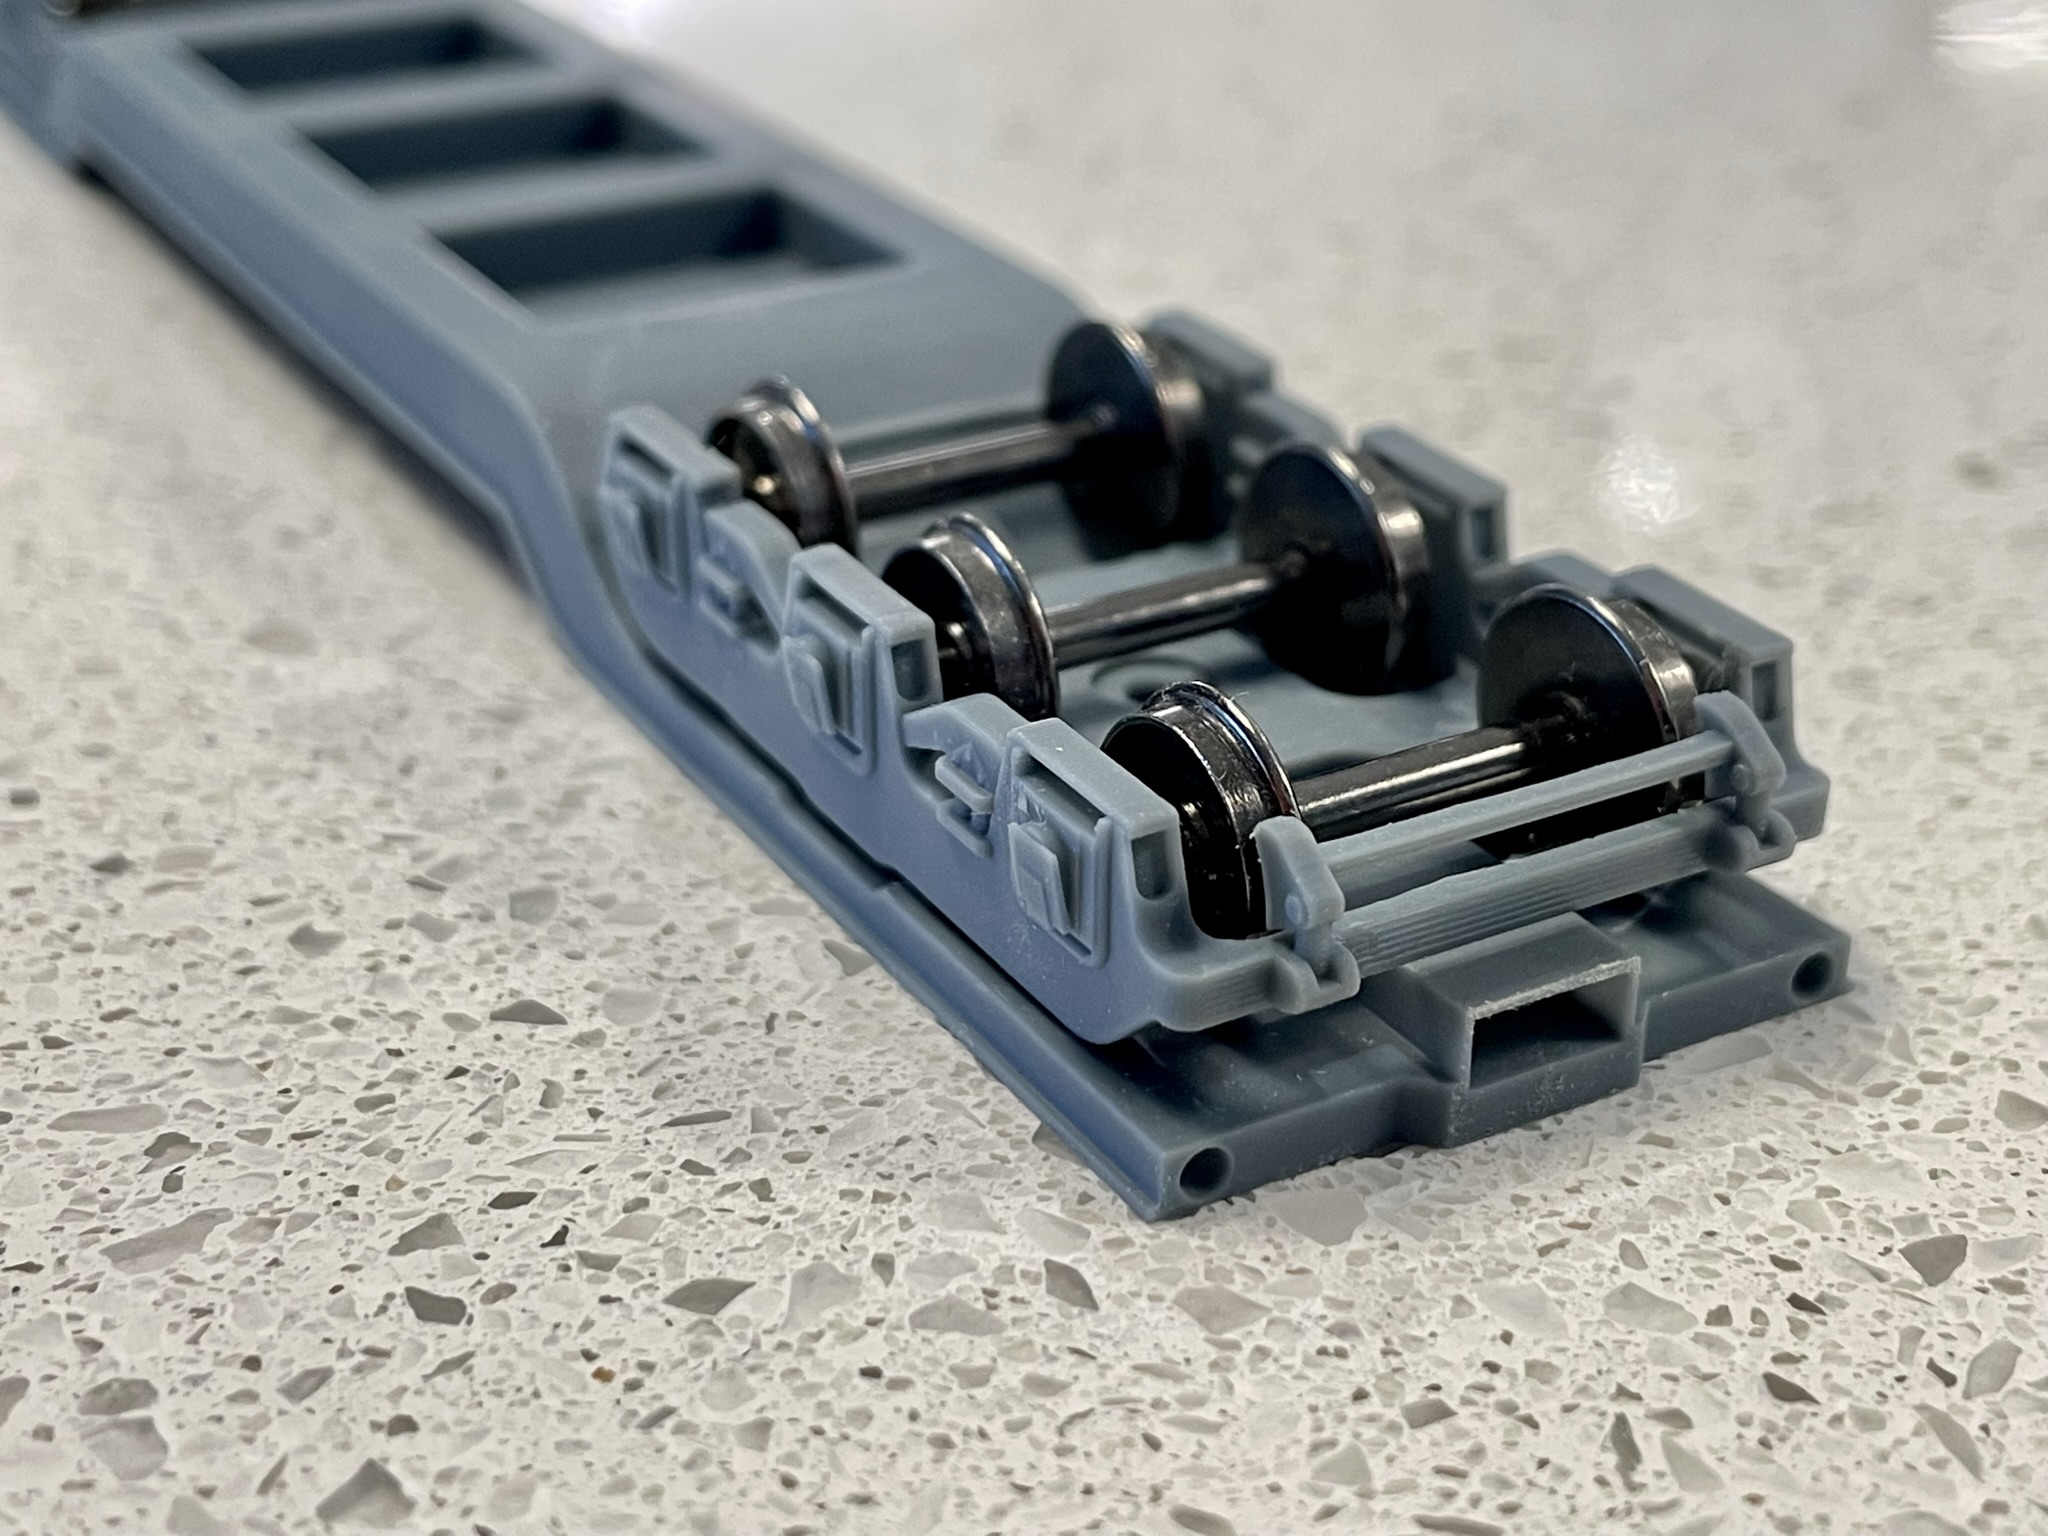
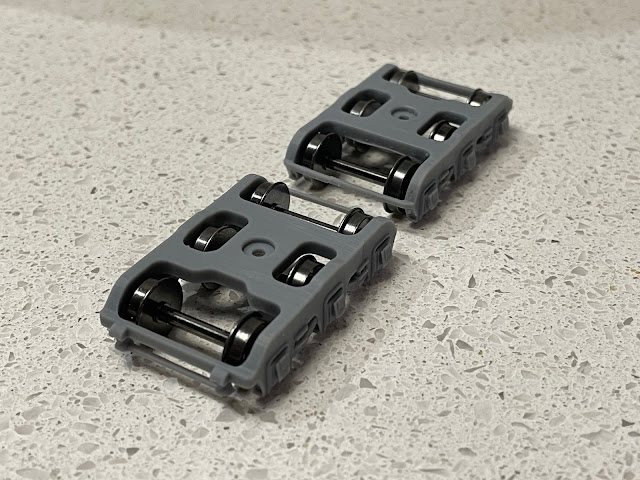
I’ve checked everything today, finalised the design, and printed the pin system to secure the trucks & couplers to the flatcar body.

I’ve settled on the print settings for the Sonic Mini 8K & the support placement that has produced an impressive print today.  I still have to print successive & successful prints without failures too.

I’m working with Highball Graphics to also produce a decal set for the RDG units.  Once I’ve achieved consistent prints, with the quality I’ve produced today & the decal sets are ready, I’ll put them up for sale online.

The kits are going to be offered as an undecorated kit, with the main flatcar section, trucks, Kadee Narrow Coupler boxes & securing pins.  I’ll list the other parts I’ve used (wheelsets & couplers) but leave the final choice & purchase to the buyer.


I’m aiming the quality & therefore price point somewhere between a Bluebox & RTR type model.  As these haven’t been on the market, and resin is somewhat untested in the hobby, the price will be reflective of this.

Jason.

Sunday 22 May 2022

New RDG - FWd - Flat Car...

Well I've been a little quite on the 3D Printing venture of late, but earlier this month things took a positive step forward with the arrival of my new printer.

The Phrozen Sonic Mini 8K, has a bigger build area, and double the resolution of my previous Mini 4K printer.  It's resolution is 0.022mm compared to the older 4K @ 0.035mm.

IMG_5421.jpeg 

280172792_1630970117281954_96777051602846484_n.jpg 

The bigger build plate has finally allowed my to print my first project at full HO Scale size.  The RDG - FWd Depressed Centre - Flat Car.

I can now fit the 54' (HO scale) flat car into the build area, at the correct build angle, and both sets of trucks.  The build time is a little over 16 hours.


This is was the first print, and also a test print after dialling the settings of the new 8K resin & Phrozen print setting.

IMG_5455.jpeg 

I was amazed at how well the first/test print turned out, there was no warping of the main body, there was no failures of any of the prints, and the flat car deck was super smooth too.

IMG_5463.jpeg  IMG_5466.jpeg 

The flat car is strong and when flexed slightly did not snap, and maintained its shape.   The trucks are flexible enough to get the Intermountain 33" wheel sets in too.


 Underneath showing the three recesses for the stick in 1/4oz wheel weights.


Next stage is to install some Kadee #158 - Whisker Couplers, screws for the truck bolsters and test out on the layout track.


 Stay Tuned...

Sunday 6 February 2022

RDG - Centre Depressed Flatcar - Test print...

Printed Version 3 of the completed truck for the RDG flatcar today.

Actually printed a full set of four trucks, prints were a success, all four at 0.03mm turned out really well.  I’ll be now using these setting for the production run.


Just have to wait for the new 8K printer to arrive so that I can do the main flatcar body.

Jason...

Thursday 27 January 2022

RDG - Centre Depressed Flatcar - First Test Print...

First test print ready to go for the RDG - Centre Depressed Flatcar trucks & connecting bracket...

If the print is successful I'll also test fit the Intermountain - Semi Scale 33" wheels too.


Sunday 16 January 2022

Reading Deep Well-Depressed Centre - Flat Car...

Over the summer break I've had very little time on the layout, I have however managed to sneak a few hours in on my next 3D Printing project.

I've stated before that research in this hobby, and in particular prototypical anything costs you money.  Well I may have found the flip side to that in 3D Printing.  Someone posted a photo of a RDG depressed centre flatcar on one of the FB pages, I have a few TTX versions from Walthers, but didn't know the Reading had there own.

So I set about gathering a few photos, and was also lucky enough to source some original working drawings of the very car, now having 2D plans is extremely helpful as I can place the 2D print into Fusion 360 and work a 3D rendering sketch from it.

So far I have the base & depress section 3D rendered, and it should just fit into my current build plate on my 4K printer, I have a newer printer ordered, which is 8K and has a slightly bigger build plate too.


More soon as I progress with the rendering & test print of the base.

Jason.

Thursday 30 December 2021

Anther ProtoThrottle to see out 2021...

As a little Xmas gift to myself, and my operators when they return once I've done a major clean...

I purchased another ProtoThrottle for the layout, that bring the layouts total to three (3), and will allow for one for each of the layouts main operating areas.


These controllers/throttles coupled with the LokSound V5 decoders I'm now using in my locomotives have made a huge difference to the operations of the layout.  Switching has become so much more prototypical...

Here's a previous video I shot using one on my layout:


Saturday 20 November 2021

RDG SD45 - Extended Cab Finished...

I've been busy of late with 3D Printing Projects going on sale, outside projects and life in general taking up whatever spare time I've had.

I managed to fit, paint & decal the SD45 - Extended Cab to one of my Kato - RDG SD45's.


I'm in the process of making up some clear headlight lenses for the cab...


Thursday 2 September 2021

The Elusive Reading SD45 - Extended Cab...

For the last two weeks I’ve been working on a project that has been somewhat of an elusive thing for most Reading Railroad modellers.

A prototypical RDG - SD45 with that 12” cab bump out…!

Some have tried various methods to achieve it, some have worked really well, others haven’t.

So with my new found eagerness to build things using Fusion 360 to 3D render them, and my 4K Resin printer, I thought why not have a go.


I have two Kato - HO Scale RDG - SD45’s, so I decided to use this as my base.  I measured the cab and took detailed measurements of everything that was detailed enough for HO.


I wanted to 3D render the cab bump out, drip strips & the Sinclair Antenna onto the cab.  So after a week of rendering in Fusion 360, a non-detailed shell - test print yesterday, some fine tuning this morning, and a whopping 4hr & 33min print, the detailed version is here.


I’ll be trying a few more different print angles, and dropping the layers down to 0.02mm print to see if I can get a super smooth finish & details.

I also primed & painted one of the test cabs too, SMS Paints work really well with the Phrozen resin...

More soon.

Thursday 26 August 2021

First GRS TR-2 3D Printed Signal Head assembled...

So today I’ve successfully assembled my first 3D - Printed GRS TR-2 Triangular Colour Light.

It has four separate pieces that are resin 3D printed, the light box, the front background disc, the rear cover/door & mast bracket.

The LED’s are all colour correct to AAR standards, and are 0603 LED’s with magnet wire, the lenses are acrylic light pipes, these are HO scale.


The printer has even managed at 0.03mm to print out the US&S logo on the back door.


These will be replacing the older IHC plastic kit heads I had.

Thursday 19 August 2021

Successful Prints…

Well I finally got my first full print build, eight pieces all successful…

Now to see if I can continually replicate it.

Tuesday 17 August 2021

3D Printing - First Prints...

So more fine tuning today, have had some really successful prints and a few that haven’t printed properly.

Unfortunately there is no manual for how to get a successful print, first time, every time.  Well apart from the test rook, that comes with the printer.

There are a few settings that can make a print work or not, a lot of the things I’m printing are under 1mm, most around 0.05mm and some down to 0.03mm so settings come into play getting this to work.

At the end of all this trial period this is what I’m trying to achieve, a GRS - TR-2 Triangular Colour Light, with its mast bracket, at least I have one…!

Wednesday 11 August 2021

Resin 3D Printing...

Well I decided to delve right down the rabbit hole yesterday into the world of 3D Resin Printing.

I've purchased myself a 4K Resin Printer so that I can start producing my own signal heads, signal parts, and whatever I feel like creating for the layout in the future...

It's going to be a steep learning curve as I have to learn Fusion 360 so that I can design & build parts in 3D, and then I need to get my head around Chitubox for the printing side of things...

This screenshot of a US&S - TR-2 TriLight Head has taken me a full day to get to this point, countless "how too" videos on YouTube, and lots of coffee...


Should have the unit tomorrow, so hopefully an update, and maybe a print by the weekend, stay tuned...

Jason...


Friday 6 August 2021

Pulp & Paper Mill - Structure Painting...

Airbrushing day today, the first of the structures for the Pulp & Paper Mill are getting primed and first coats of colour.

The bleach plant has had its primer done, and first two coats of SMS - Tan color, the roof will be SMS Light Gull Grey.

The Woodchip Unloading building has been primed, I tried Rust-Oleum - Flat Grey Primer for this, and it goes on great, quick & even coverage, just have to wait overnight for it to fully cure on the plastic.

Jason...

Wednesday 4 August 2021

GType/Tri-Light - Signal Mast finished...

Finished up the GType/Tri-Light triple head mast that is using the Showcase Miniatures heads.

Showcase Miniatures - Tri Light Signal Head

The three heads have been added to Tomar brass mast, the LED’s are color correct 0603’s with magnet wire.


These have been an enjoyable build, to the point I’m considering changing over the existing IHC - Searchlight plastic heads for these.  They have more detail and I’ve got the process down to a point I can complete a head in about 30 minutes.

Jason...

Tuesday 3 August 2021

Finished the Concrete Areas for the Pulp & Paper Mill...

Finished off the concrete area for the Pulp & Paper Mill this afternoon.  Went really quickly, even having to reprint three A4 sheets because I printed them on the wrong side…

Checked all the track clearances with the SW1500 Switcher and some rolling stock.

I’ll add line marking, expansion joints, and more detailed later on in a second round.

Monday 2 August 2021

Pulp & Paper Mill - Concrete Standing Areas...

Finished up the major portion of concrete standing areas for the Pulp & Paper Mill today.


Have one more section to go in the truck loading area on the west side of the complex.

Once the concrete areas are finished I’ll give the structures their first coat of paint.

Jason...