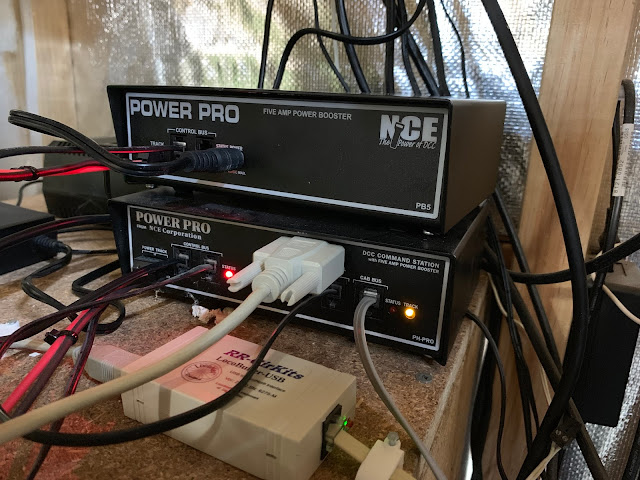
Today I began the process of installing the electrical hardware to power up the Helix, Staging Deck and the Engine Terminal.
I've purchased a NCE - PB5 Booster as the second power source. This was connected to the control bus on the original PH-PRO and then connected to two PSX - Circuit Breakers.
The PB5 feeds firstly into the PSX for the Helix and then into the second PSX & BDL168 that powers the Staging Yard & Return Loops.
I've again used a accu-lites board to connect to the BDL168 for ease of wiring. The return loops are powered through a PSX-AR (auto reverser) that provides short management and polarity reversal when the train crosses around either of the loops back onto itself.
Next step is to wire up the track feeders for each Staging Track, the Staging Ladders and the return loops.
More soon.
Jas...
Thursday, 28 March 2019
Wednesday, 27 March 2019
Staging - Return Loop track work completed...
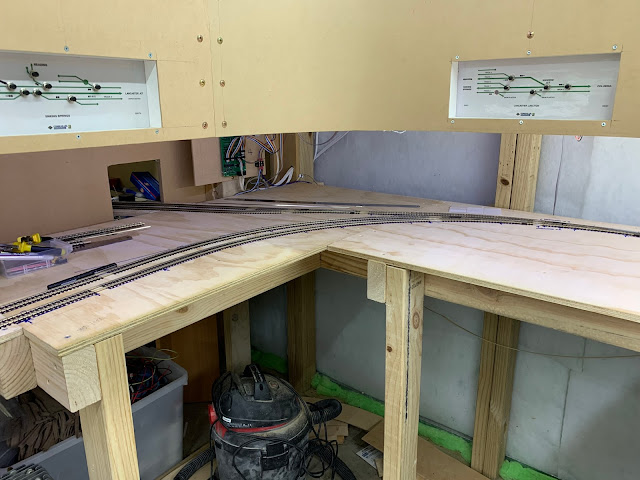
Today was the final push to get the outer & inner return loops installed for staging.
It only took a couple of hours to get the remaining sections installed around the curves and into the last straight section before joining back onto the junction turnout.
I had to install a few braces to support the return loop on the back side, because it sticks out past the fascia now, I will be adding a small corner section to the fascia, along with bump strips along the outer edge.
The inner and outer loops connected back to the junction turnout for the return loop...
Next step will be to install the PSX-AR for the return loop, and wire up the staging yard track work.
Jas...
Saturday, 23 March 2019
Return Loop track laying begins...
Yesterday I started the installation of the outer and inner loops for the return loop section of the staging yard.
The original plan had the turnout for the inner & outer loop starting further up, I decided to try a curved turnout closure to the junction. This worked out much better for flow, increased the length of the inner & outer loops and has made the detection sections better too.
The outer loop radius has been set at 30"R and the inner loop at 28"R, I'm again using the cork roadbed spacer to set the distance between tracks.
The hole has been cut through the real wall of my old workbench space and the outer loop aligned with the turnout that leads to the loop junction.
More soon...
Jas.
Thursday, 21 March 2019
Return Loop - Benchwork...
Today was spent getting the return - loop benchwork installed. The loops are basically a single deck helix that are 5 5/16" (135mm) wide allowing for two tracks.
The plywood sub-roadbed is the same that I used for the layout helix and the staging deck sub-roadbed, it is 5 ply, 15/32" (12mm).
The first step was to align the curved section of track into the first curve of the return loop.
Once this was installed and the transition pice installed I was able to move onto adding the remaining sections of the return loop plywood.
The joins between section were secured using perforated sticking plate and stiching screws. This was the same method I used on the helix.
Once I had the two full sections installed I moved onto installing the straight transition section from the last return loop curve back onto the plywood staging deck, this required a hole to be cut through the backboard.
Tomorrow I'll finish off the remaining braces that need to be installed, and secure the return-loop plywood curves down to the braces and install the track.
Jas...
Wednesday, 20 March 2019
Staging Deck - Return Loops...
Today I installed the remains section of the 28"R curve that connects the southern - staging ladder to the return loops.
There will be two return loops (inner & outer) to allow for passing manoeuvres to occur during ops sessions.
Once this was completed I begun working on the return loops benchwork and its positioning under the layout.
The return loops will be formed like a single helix loop to save on building an entire section of benchwork.
The outer loop will be a 29"R and the inner loop will be a 27"R, the inner and outer loops about 13' (4 metres) each in length.
Jas...
Thursday, 14 March 2019
More staging bench work installation...
Today I installed the bench work and plywood sub road base that will form the extension from the southern staging yard ladder to the start of return loop.
This section will have a 28"R curve that will connect the junctions from the return loop.
So at the end of today I managed to finish off installing the benchwork, and plywood base and the start of the 28"R curve.
Jas...
This section will have a 28"R curve that will connect the junctions from the return loop.
So at the end of today I managed to finish off installing the benchwork, and plywood base and the start of the 28"R curve.
Jas...
Wednesday, 13 March 2019
Southern Staging Yard Ladder installed...
Today I managed to get the southern end of the staging yard ladder installed.
I've isolated each of the six (6) storage tracks from the yard ladder.
Next stage will be to install the bench work for the curve leading into the return loop.
I've isolated each of the six (6) storage tracks from the yard ladder.
Next stage will be to install the bench work for the curve leading into the return loop.
Tuesday, 12 March 2019
Staging moves around the curves...
Today was a productive day as I managed to get the Staging Tracks all the way around curves on the Staging Deck.
I used a RibbonRail - Metal Alignment gauge to set the initial 28"R on the arrival/departure track. Once this was set and pinned down using track pins I then cut several strips of 1/8" cork sub roadbed 1" wide and then used this to maintain a track, centre to centre of 2 11/64" (55mm) between tracks.
This worked extremely well and consistently kept the track centres at the above measurements. The out most staging track is a little over a 40"R. Once I had the two inner track set and pinned I checked the clearances with my longest pieces of rolling stock.
I then installed the remaining five tracks using the cork roadbed strips as a guide.
All the tracks have now been installed around the curves and the next phase is to install the southern yard ladder.
More soon.
Jas...
Wednesday, 6 March 2019
More Staging Deck progress...
Reached the curves in the Staging Deck track work, picked up another box of Peco - Code 100 track today to continue on.
Another 6’ - 2m to go and the staging tracks will be completed, and then onto building the double track return loop.
More soon...
Jas.
Another 6’ - 2m to go and the staging tracks will be completed, and then onto building the double track return loop.
More soon...
Jas.
Subscribe to:
Posts (Atom)


