Favourite Photos...

Favourite Photos...
Reading Lines GP35 #3647

Middletown, Pa

Thursday, 12 April 2012

JL&T Railroad - Layout Update & Important News...

"Just thought I'd add that the JL&T is not going to be dismantled as mentioned below, we are still in our current house and the layout is still being built". I will leave this post in situ to show the layout plan that I was going to build if we moved...  Jas.

Hi everybody,
I've been holding off as long as I possible can with this news, it's a little bad news, but it is only temporary bad news (well possible a few months anyhow).  And there will be some great news at the end!
During the last month we have been presented with a golden opportunity to build new and upsize to a bigger home and move to an area that we have always liked and will suit our growing family more than our current location.  So our house is now on the market and we have purchased our new block of land about 15 minutes north from our present area.
This does mean that the current JL&T Railroad is in limbo and will not have anymore work done on it, mainly because the layout room has reverted to storage for our excess furniture and other things that need to be out of the house while we are trying to sell it.  And I'm dedicating most of my free time to organising the building of our new home.
That is the bad news.......
There is a couple of bits of good news though, the first and biggest (literally too) is that when we do build on the new block with our new home, there will be a brand new, bigger layout room for the JL&T.  With some added additions that have come about from building the JL&T - Mark One, the original layout shed was 7m x 4m (23.3' x 13.3') which was a good size to start with, but some of the things I wanted to do were limited by the size.
The main things that I wanted changed was the helix location and some of the track configurations, so with this in mind and the ability to build a shed/layout room a little bigger it has...  The new home of the JL&T has grown to a 10m x 5m (33.3' x 16.6') it is divided into two areas internally so the layout room will be 8m x 5m (26.6' x 16.6) the other smaller room will house the layouts 30" helix and be a utility room for storage.
The new JL&T Layout...

The major differences between Mark I & II are, the addition of the helix outside and separate of the layout room, the wye that has been added upon entry to the top deck that will allow for trains to travel in either direction upon entering the top deck, the increased staging on the southern side of the top deck (modeled as a small interchange yard), the area near the JL&T module has another scenic element area added (to be determined what it will be), the intermodal terminal track work has been extended and straightened, the L&T Branch track work has been changed.
The existing Mark I JL&T...

Compared to the old Mark I JL&T there are some significant improvements and additions that have me very excited, I will also be looking at a different method of doing the bench work, I over engineered the last build and do not need to go to that level again, also the sequence that I did a few things in will be changed too.
The other good news is that I will continue modeling by doing another practice module or two, along with some submissions to MRH to go along with these.  I will also be building my turnout controls so that they are ready to go on the new JL&T, it will also give me a chance to try some weathering on both rolling stock and locomotives too.
So in all a little disappointing that I have to stop on the layout when I was getting into the fun part of the build, but the future is looking very bright and promising for the new JL&T...
Jas...

Saturday, 31 March 2012

JL&T Railroad - L&T Branch Track Work - Update...

Some more track laying on the L&T Branch over the last couple of days.  Getting the mainline and passing siding in, and positioning the spurs.

Passing siding on right & mainline on the left...


JL&T Module on the left, L&T & JL&T crossover...


L&T siding, future home of L&T Manufacturing...


Cheers,

Jas...

Friday, 16 March 2012

JL&T Railroad - L&T Branch Track Work...

Hi All,

Well today I started the final sections of track work for the JL&T.  These being the L&T Branch and the remaining section connecting the JL&T module to the centre peninsula.

The L&T is a industrial branch that will serve a couple of small industries and either one large or two medium sized industries.

The two entrances leading to both the JL&T module (right entrance) & L&T Branch (top entrance)...


Looking back through the backdrop from the JL&T module...


The L&T Branch looking towards the west end...


Looking from the centre peninsula through the backdrop to the JL&T module...


The JL&T branch coming off the centre peninsula passenger siding...


More cork sub roadbed to lay, and then more track work too.  More photos when we have more of the branch down...

Cheers,

Jas.

Wednesday, 14 March 2012

Sunday, 26 February 2012

L&T Branch Backdrop Update...

Some quick photos from the progress on the installation of the backdrop for the L&T and JL&T branches.

The mudding of all the joints and screw holes has been completed, and just have to apply a sealer/undercoat then two coats of the final sky blue colour.

I've also added the 10mm plaster/drywall sub roadbed to the area, the 3mm cork will be applied after painting.

Looking at the JL&T module location and the start of the L&T branches...


The corner showing the entry from the centre peninsula area for the JL&T (module) & L&T branch lines...


Looking back towards the end of the L&T branch and the layout entry...


Jas...

Sunday, 19 February 2012

Going the extra mile... A story of excellent customer service from Litchfield Station...

Just thought I would share some thoughts with you all about a recent experience I had that deals with what can only be described as "excellent customer service" and conversely "not so good customer service".

As you have seen by one of our previous posts I needed an automatic reverser for the centre peninsula.  And as you would have seen I decided to go with a dealer here in Australia.  Well due to a lack of communication and an a fairly long wait time, I decided to cancel that order from Australia and go with Litchfield Station in the USA.

Well good old "Murphy's Law" struck, the morning I cancelled the order, and ordered from Litchfield I was checking our bank statements.  And guess what, yep the order had gone through and another hour later the package showed up, I didn't receive any information that the package or order had been processed or shipped.

Well a quick email was sent to the guys at Litchfield to ask if I could hold the extra AR I'd ordered and change it for some Tortoise Motors that I needed next, and as luck wouldn't have it (Murphy again!) and because of Litchfield's "SuperFast" service the package had already shipped.

This is the "Excellent Customer service" bit, I received an email from Nancy at Litchfield apologising that she'd missed the email, and that the order had been processed, and the AR shipped.  Now this happened over night, how quick is that?  The bit that really impressed me was that Nancy offered to let me return the AR (by refusing the shipment when it arrived) and that she would then send out the Tortoise motors and charge me the difference.

This folks is what real, honest, and going the extra mile customer service is all about!  Litchfield didn't have to help, or even offer a solution, it was just bad luck what happened.  But to their credit they offered to help, came up with a great solution and have earn't themselves a lifelong and loyal customer for anything DCC!

So as a special thanks to Litchfield Station & Nancy in particular, I decided to give them a free plug and glowing recommendation to all on our JL&T blog & MRH for their outstanding customer service and great products!

Cheers,

Jas...

Friday, 17 February 2012

JL&T Railroad - Installing the Auto Reverser...

Well this week our DCC Specialities PSX-AR Auto reverser arrived, and it has already been installed on the JL&T under the centre peninsula.

The PSX-AR comes with very good instructions for installation & additional add ons...


The wiring for this is very basic if you are using it for a straight forward automatic reversing module, it has many other function that can be added and configured.  But for the moment I'm going to be using it as a straight forward AR.

The installation is 2 wires in and two wires out, thats it!  Nothing complicated and nothing else to do, I have placed ours near the JL&T helix area & Workshop bench.  This will make getting to it for additions later on or checking the LED status lights easier.

The location of the PSX-AR, central to the centre peninsula...


Eventually I will house the module in a plastic electrical box to stop dust build up and unwanted bumps from when working around the AR.

I have used spacers behind the PCB to lift it away from the timber fascia support.

The AR feeds into a wiring block that then splits into two, this will then feed into another two separate blocks of around six.  The idea is that the entire centre peninsula is powered through the AR, then the power is going to be split into five (5) power districts that will each be protected by an 1156 Short Management Device.

The first wiring block that splits into two (2) and then feeds another two separate power district blocks...


***WIRING WARNING FOR KEVIN, MORE NEAT STUFF BELOW***...


Once I have the power districts installed & the mainline wired in and protected I post another update and video of the first locomotive run across the centre peninsula and the AR operation.

Jas...

Thursday, 16 February 2012

JL&T Railroad - Fire Station - Update#2

Quick update on our Fire Station build, I'm currently adding interior structural columns and beams to the inside of the engine bays.  This will also support the first floor and the tracks that will allow the appliance doors to slide up and down.

I have also been adding vertical wall surfaces to the modular panels to hide the moulding details that will be able to be seen from looking through the doors.  These will all be painted and weathered to look like the inside of a real firehouse.

Shot showing the supporting columns and beams...


The concrete columns and beams which are 4.8mm x 4.8mm (3/16") square styrene tube, have also aided in strengthening the entire structure too, there will be another layer of I beams (as joists) added on top of the concrete columns.  The joists will then support the floor which will be 2mm (080") Styrene.  The vertical interior walls are 0.5mm (0.20") styrene.

Shot showing the interior walls (white styrene) in place...


Concrete columns and beams...


First floor in place showing how the concrete beams support the first floor exterior wall...


Front of the Fire station, this has been changed since the last update...


Rear section showing aerial appliance bay & chief's car extension, with split roofs...


Rear station shot, this was the front...


Next step will be to work on the roller door channels, and the first floor base.  Both the roof & first floor will be designed so they can be lifted out.  Once this is completed it will be time to undercoat the entire building.

Jas...

Sunday, 12 February 2012

JL&T Railroad - Fire Station - Update#1

More progress tonight, first floor finished and a little work to go on the small roof sections on the extensions.


Front of the firehouse...

Front left, there is still considerable work to be done to align the walls at the joins...


Rear section of the firehouse, still have to do the parapet wall and roof on the extension section...


Once the exterior is done I will begin work on the interior walls, columns and ceilings.  And yes there will be brass poles from the first floor to engine bay...

Jas...

Saturday, 11 February 2012

JL&T Railroad - Fire Station...

Well tonight I started yet another build for the JL&T.  Although this was all done in the relative comfort of the house and not the layout shed.

A little while ago I purchased several Walthers Cornerstone - Modular Kits (they were on special) well an entire box load actually.


The idea was to give myself the freedom to construct whatever size and configuration of structure/building I wanted.

I'd already purchased one other type of modular kit, which has been used in the BAPM Plastic area.  And the flexibility of the modular kit appealed to me.

So this is our first attempt, a major fire station for the JL&T.  This will be located on the centre peninsula near the layout entrance.


It is based around a 70's to 80's style, two storey, three bays (one extra long for the aerial appliance.  With mess and sleeping quarters above.  I'm hoping to fully deck out the interior on this little project.
And in case some of you are wondering, firefighting is my current and has been my paid profession for the last 10 years.


Shot showing the base & ground floor configuration all set out...


Ground floor finished, wait overnight for the glue to cure...


Rear section of the station with extra long bay for aerial appliance...


Then tomorrow night ready to start the first floor mess & sleeping quarters...


More to follow as the build progresses,

Jas...

Friday, 10 February 2012

The L&T Branch line gets its backdrop...

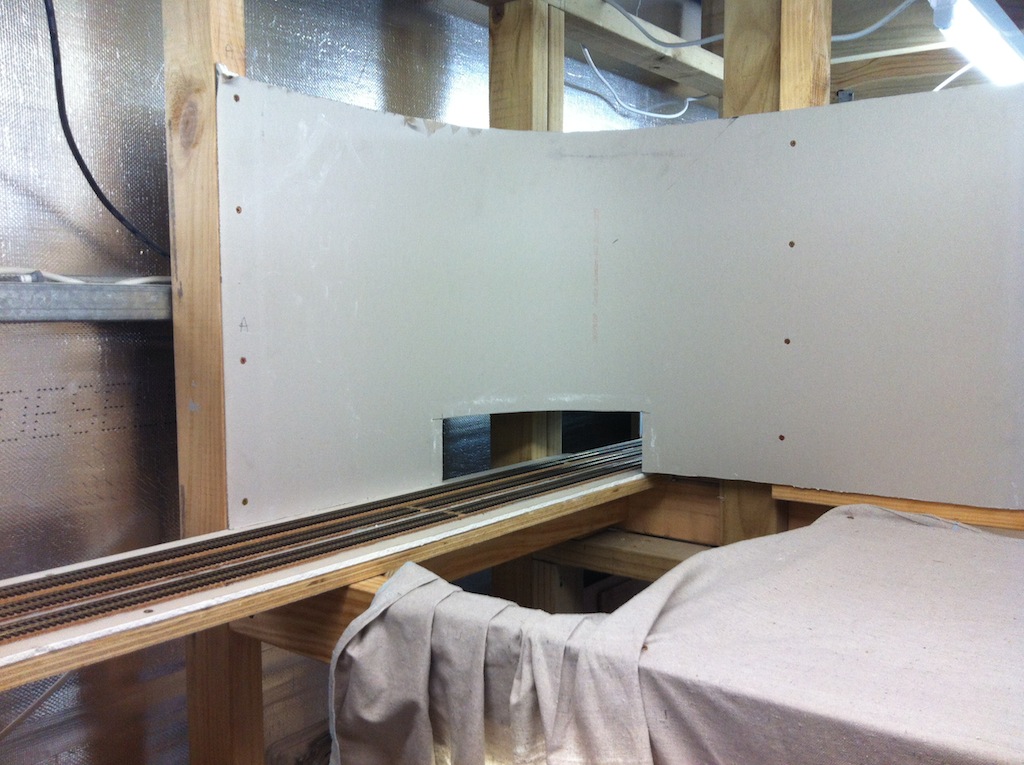
Well today was an extremely productive day as far as time used and outcomes achieved is concerned!  I managed to install the plaster/drywall backdrop for the entire L&T Branch & the area that houses the JL&T module.  For those that haven't seen this section to date or don't know it, it is a small section located behind the centre peninsula area on the extreme south side of the layout shed.

The L&T Branch is a small heavy industry area that is going to have some larger type industries to service.  It was designed so that one to two operators can switch this small section away from the main layout room.  It is only 250mm (10") wide and will mainly consist of "Background Buildings".

The area also houses a three (3) track staging area, and a possible location for the layout helix (this may be changed to an external shed) in the large area in the middle.  The JL&T module is also located in this area.

The plaster/drywall backdrop was installed in the same method as previously employed on the JL&T.

This area is for the JL&T module and a possible helix location...


This is the west side entrance from the main layout area to the staging tracks...


The L&T Branch entry (on the left) from the main layout area, and the JL&T Module entry (on the right) from the centre peninsula...


The area on the right is 250mm (10") wide and will allow for a background building kit structure, and one to two tracks...


Looking back towards the layout entrance and the east side of the L&T...


Next step is to mud up all the joins and screw holes, then lay the plaster/drywall & cork sheet sub roadbed.

Jas...

Centre Peninsula - Benchwork Extension...

It was mentioned a little while ago that the track work on the centre peninsula near the siding & spur that leads into the freight terminal was a bit to close to the edge.  Well it was very close so yesterday I decided to add an extension to this section to fix the problem...

The section adds another 78mm (3") to the benchwork...


The extension is a single piece of 90mm x 35mm pine, and uses small 100mm x 45mm blocks behind to add the extra depth.  This is all screwed to the existing benchwork.


The same finished height has been achieved in the same method as the existing benchwork on the JL&T.  17mm plywood (5 ply) topped with 10mm plaster/drywall and 3mm cork sheet.  However on this section the cork will be left off as it will be a raised rock cut from the the right side (entering the sidings) through to the road.

This will help stop any wayward trains from taking an extremely long & costly drop to the ground below...


The front of all the benchwork will have a masonite or similar fascia installed at a later date.

Jas...

Thursday, 9 February 2012

More Crossovers...

Hi All,

In our last update I showed a #8 crossover that we installed in the north intermodal siding, which also included a #6 crossover from the south intermodal siding to the mainline.

These have worked very well and after a little ops session the other night I decided that I needed another crossover from the south side "Oil Transfer Terminal" siding back onto the mainline.

I had two Peco "Electrofrog" turnouts that I got by mistake and decided to use these, they have been placed leading from the south siding heading back east onto the mainline.  They are located to the east of the newly installed crossover from the intermodal terminal.


One little word of advice to, when using Peco "Electrofrog" turnouts make sure you cut the isolation gaps for the frog before you turn the track power back on!  Lots of really bright lights coming from under the deck from the Short Management Devices......

This has added to the operational potential of the area by allowing motive power to enter & exit the sidings back to main without having to traverse the enter siding length.  Now all I have to do is install the turnout motors to 9 turnouts, more wiring...

Jas...
Friday, 20 January 2012

Mainline Update - 20/01/12

Just a couple of quick photos from track laying last night & today...

Passenger Terminal, Freight Terminal, Mainline & Passing Siding...


Lots of crossovers & lots of switching...


The next section to be laid...


Jas...


Thursday, 19 January 2012

Auto Reversers - Not so hard...

Howdy everyone,

Well this a quick post and a plug for Richard from DCC Concepts in Western Australia, for his great customer service and help with explaining how and where to install the auto reverser on the JL&T.

Basically our trackplan has created a reversing loop that was going to require a dedicated auto reverser,  the problem was I wasn't understanding the concept on where to actually place it, and how they really work.

I had been doing research online to find a suitable reverser and decided on a
DCC Specialities - PSX-AR, these were recommended by several people.  DCC Concepts are dealers in Australia.  So I sent Richard an email this morning and asked for some help on the layout and location of the PSX-AR and within an hour or two he'd replied with two possible solutions and diagrams as well.

After looking at the diagrams I still wasn't 100% sure I had the concept right, so I gave Richard a call to ask a few more questions.  Within a couple of minutes the light had come on and I was set, no more wondering if I had it right, it's all understood and I'll be ordering one next week.

Anyhow for those interested here is the auto reverser block Richard offered as one of the two solutions that we will be using on the JL&T.  This one works perfectly for the layout design as it allows us to keep the outer loop connected as it is presently, it is also longer than "any" train we'll be running on the JL&T.  This design will still allow trains to enter and exit the south staging area, from both east & west too.  The auto reversing block is marked by the red dashes across the track.


The Auto Reverse block is marked by the red dashes, and circled...

For those that are new to the concept and how the auto reverser will work, the power for this entire block will be first routed through the PSX-AR and then fed out to the remaining bus wiring in the AR section.  When a train (the powered locomotives) cross either of the AR block boundaries, this will cause a short and make the AR switch the polarity for the entire section.  The only caveat to this is that only one train or locomotive can cross either boundary at anyone time.

Jas...

Wednesday, 18 January 2012

Mainline Madness - Almost finished...

Well in the not to distant future I will hopefully have the mainline on the centre peninsula completed, and it will also be the final section of the top deck mainline to be completed too.

Once this is finished it will mean I will finally be able to start with the scenery phase of the construction, and also start operating the layout and having open ops session.


This photo shows the relocated passenger terminal in its new location on the south side of the mainline on the centre peninsula.  This was swapped as I wanted to add additional passing sidings & a freight spur, this could only be accomplished on the north side of the mainline.

So the passenger terminal & freight terminal have been swapped to accomplish this.  Now I have a passing siding and freight spur on the north side of the mainline.


The freight terminal has it's own dedicated two sided unloading dock, and an additional unloading spur on the south side.  I wanted to have both as it adds so much more for operations and switching.  In addition you can see the passing siding next to it (south) and the the mainline.  There will be a crossover between the freight spur and the passing siding to allow movements when cars are spotted at the freight terminal.


The next section is a series of curved turnouts incorporating Walthers Shinohara & Peco curved turnouts, these range from #8 through to #7.5 and #7 in both brands.  These series of turnouts allows for trains & switches to move between the mainline and the various passing sidings, passenger spur, freight spur whilst the others are occupied.


The curved turnouts also serve the food industry that is located on this curve, to date the industry has not been decided but the structure is based around the Walthers Cornerstone "Magic Pan Bakery" kit.  This will be added to via a Pikestuff add on kit to allow for a refrigerated storage & transport area.
This industry will see a wide variety of tank cars, box cars, covered hoppers and refrigerated box cars and is served by two spurs.


The last section will be the timber wholesalers & hardware warehouse, this section has been moved from opposite the freight terminal.  This was due to the limited space available in this location to store to 74' centre beam timber cars.  It also didn't do the industry justice, as I wanted this to be a fairly busy wholesalers.  I want to be able to deliver bulk raw timber loads and also generate outgoing finished timber boxcar loads.


More updates to follow shortly when I finally get the last mainline track in...

Jas...