Favourite Photos...

Favourite Photos...
Reading Lines GP35 #3647

Middletown, Pa

Monday, 24 February 2014

When you cant find anymore RDG - Rolling Stock...

You go out and you make your own...
These are not prototypical, but I really want to build up my Reading Lines rolling stock.  Seeing that I have taken the liberty of letting the RDG live on through and into the Conrail era these will be a newish acquisition.
They are based on a Atlas Trainman ACF 50'6" Box Car.  These are undecorated and I will be painting them, applying decals, weathering & detailing.  There will be four of these boxcars done in different RDG schemes.
More to follow soon.
Jas...

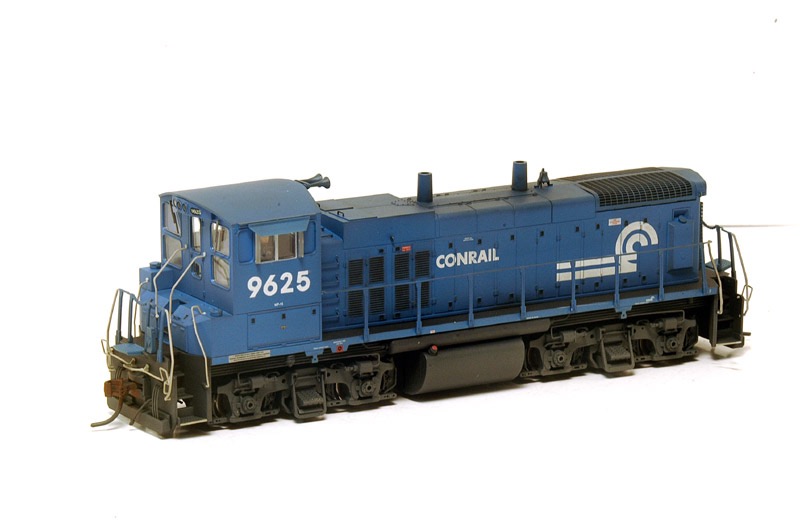
CR #9625 MP15DC...

Working the L&T Branch today...


This switcher is another by Jim Rinker of Delano Mountain Custom Models, it has Soundtraxx Tsunami Sound, Custom Numbering, Weathering & Detailing.

Jas...

Sunday, 9 February 2014

More RDG GP35's to the roster...

I recently received some more RDG GP35's to be added to the roster, one is a Athearn RTR numbered for RDG #3629 and the other is a Kato RTR numbered for RDG #3645


I plan on weathering these two once I've practised on a few more box cars, I'll also be adding Soundtraxx Tsunami Sound to both too.

It's getting increasingly harder to find these in different road numbers, hence the reason why I jump on them when they pop up.

Jas...

Thursday, 23 January 2014

Atlas - Silver Series - Conrail #9625 MP15 DC Switcher...

Hi All,
Well another switcher from Jim Rinker is about to grace the JL&T shortly.  This is a Atlas - Silver Series MP15 DC, Conrail No Number Switcher.  


It was custom numbered to #9625, had Soundtraxx - Tsunami Sound added, and was custom weathered.


Cheers,
Jas...

Tuesday, 7 January 2014

More fascia & valance progress...

Around the corner we go.  Today's progress on installing the fascia & upper valance, we rounded the 45 degree corner today, the install was relatively easy.

Working with the 3mm MDF sheet is easy, very flexible, light weight and ends up looking very smart.


All that remains is to infill the gaps between fascia and the bench work and paint.


Not much more to go, however I have to finish off the remaining structures and scenery.  When this is finished I'll be ballasting the staging area which is opposite the L&T Branch, then onto finishing off the drywall underneath.

Jas...

Wednesday, 25 December 2013

Allied Warehouse & Storage...

Being switched out by Conrail SW1500 Switcher #9528...


Merry Christmas to all...
Jas.

Wednesday, 18 December 2013

More Fascia & Valance Work...

Well today was a big day, managed to get the frame for the upper valance installed (the block rail to which the MDF secures to) finished, installed the ceiling panels (which are also 3mm MDF), and install two section of upper valance.
Firstly thanks for all the feedback on the colours, and thanks to Prof Klyzlr for the animated GIF too.  Next I'll post some picks of the installation today and how it all went, followed by a few photos of the different colours I'm looking at.
Firstly a corner shot showing the two section of upper valance installed.
Next shot is the internal corner and how I secured it to stay tight and also make it easily removable.
Next is the brackets that will keep the MDF straight to the backdrop and hopefully resist warping (for Alan).
Next shot shows the height (for me) to be able to reach in, hopefully this will give everyone some perspective of the actual opening.  I'm 6'2 and at this height (its actually 60" - 5' from floor to top of fascia) it works well for me, I'm setting the layout to me, and if there are shorter people well they will have to "step stool it".  
I can probably open up the opening maybe another 2" (50mm) but anymore will allow the framework & top of the backdrop to be visible to me which I do not want.
Next shots are a few of the next section of L&T that has had the upper valance installed, thus framing the scenes.
Next series of photos show the overall corner scene with 3 different coloured renders, Dark Grey, Dark Green & Black, the voting is open...
Dark Grey...
Dark Green...
& Black...
More soon...
Jas.

Monday, 16 December 2013

Another busy day on the L&T...

RDG GP35 #3647 is busy spotting covered hoppers into the plastic pellet unloading shed...


Jas...

L&T Branch - Fascia & Upper Valance...

Hi all,
Well today I decided to finally start installing the L&T Fascia & Upper Valance.  I have been thinking about the materials and method to install this for awhile.
Firstly I wanted something easy to install, relatively light in total weight, easily removable and easily painted.  I had thought about masonite, plaster/drywall, styrene and a whole range of different materials.
So today I went down to the hardware store to see what they had.  I finally settled on 3mm MDF they have pre cut sheets 1200mm (4') x 600mm (2') and this works out perfectly for the two sections I require.  The fascia is 120mm (5") and the upper valance is the remaining 480mm (19"), this has worked out to be an ideal ratio for the viewing window too.
Its amazing the difference once the scene is framed, the lighting with the fluorescent lights towards the fronts is near on perfect and it is so nice to not see any framework anymore or wiring & lights.
And this is the eye level view (my 6'2" eye level) from directly in front of the L&T Branch (JL&T Module)...
Next step is to continue on around the corner and along the L&T Branch.  I'll post some more photos of how I have achieved the installation of the ceiling, placement and the securing of the brackets for the upper valance.
Cheers,
Jas...

Thursday, 28 November 2013

More Photo Backdrops...

So today after doing some work around Allied Warehouse & Storage I thought I would add the photo backdrop that I had in mind for inside this industry.
And from what I can see I'm pretty happy with it, not spot on from all angles but darn close.


Jas...

Sunday, 24 November 2013

Fence Updated...

Here is a little alteration to the fence at the rear of Allied Warehouse & Storage, Alan reminded me the other day that I had forgotten the top cross bar.  So the other day I added it, and the corner diagonal cross brace too.


Cheers,
Jas...

Thursday, 14 November 2013

Allied Warehouse & Storage Nearly Done...

Well today was an extremely productive day.  The rear chain wire fence has been completed and installed, the Hayes bump stop has been weathered and installed.
The chain wire fence is the BLMA version, very prototypical and easy to work with!
The signs for the structure have been installed and the LED lighting to the front and rear doors has been installed and weathered. And the windows have been randomly darkened with washes.
Only thing left to do now is install the remaining ballast around the structure and redo the backdrops.
Cheers,
Jas...

Tuesday, 12 November 2013

My first attempt at weathering...

Well yesterday and today I finally bit the bullet and tried my hand at weathering a piece of rolling stock.  I'd been putting this off for some time as I was unsure if I was going to be able to achieve the standard I wanted.
My idea is to be able to get one piece done in a hour or two (and down under an hour with practice), I also want a weathered look that is in line with the "good enough principle".
So with the catalyst of wanting a few pieces of rolling stock for layout photos showing completed stages I decided to start with a Atlas 50' Yellow "Railbox" Boxcar.
I've been reading just about every thread on MRH & the internet about weathering rolling stock, and decided for the first attempt to use my newly acquired Vallejo Model Washes.  First step was to remove all the couplers, and wheels. This was followed by several coats of Dullcote to flatten the plastic sheen, and give the boxcar some tooth for the washes and oils.
One the Dullcote had dried I started with the roof, first off was a good coat of grey model wash.  This was allowed to almost dry and then a coat of dark brown model wash, as this was drying I lightly wiped off some of the areas on the peaks of the roof panels with a cotton lint free cloth.
I then dried these series of washes with a hair dryer, then it was a coat of rust coloured wash, and finally a black wash to highlight the seam and details.  As this was drying I again using the cotton cloth to dab this time to give a mottled look to the dirt & grime.  Once this was nearly dried I again lightly wiper some of the wash off the higher panel sections.
This was the outcome of the roof:
Next was to move onto the sides & ends of the boxcar, I used a similar principle for the sides as what I had used on the roof.  I again firstly applied a coat of grey model wash to all the panels, once this was applied I used the cotton cloth to wipe most of the excess wash off, trying to leave a little in the panel seams and around the areas that would naturally collect dirt & grime.
Then once this had almost dry using a fine flat brush the same width of the panels, I soaked the brush in water and thinned out the remaining wash and blended any pools of wash so that they looked like downward streaks from rain.  Again when this was nearly dried I used the cloth again to form the streaks towards the bottom of the panels.
I then dried this whole step with a hair dryer making sure not to disturb any of the wash that was sitting in the door tracks or areas that need to be highlighted.  I then went and applied a second layer of wash but this time dark brown, again using the same method as the first to thin out and distribute the wash to the required areas and form the streak effects on the panels.
Lastly I went over the areas that needed highlighting and extra dirt & grime with a thinned wash of black.  Once this was dried the entire boxcar was coated in Dullcote.
This is how the panels/sides came out:
The trucks were painted with PS Grimy Black and then dusted with AIM Dark Rust & Black weathering powders.  The wheels were painted with PS Railroad Tie Brown & dusted with Dark Rust weathering powder.
Next stage will be to weather the finer details (rust, more grime, and highlights) with oil paints using dry brushing.
Overall very happy that I had a go, and with the results.  The photos actually don't show it to well, but it actually is a little darker in the flesh and is exactly the level that I wanted to achieve.
Stay tuned for more weathering soon...
Jas.

Almost complete...

The new L&T structure Allied Warehouse & Storage is almost complete.  The windows have been installed after being sprayed with Dullcote to "frost" the windows out, the weathering is complete and all that remains is to add some signage and LED flood lights.
Then onto ballasting the remaining track work around the structure and installing the chain wire fence at the rear and re-installing the backdrops.
Again the finer weathering such as the rust streaks from the window frames was achieved with oil paints & dry brushing...
More soon...


Jas.

Friday, 8 November 2013

Allied Warehouse & Storage...

The latest structure addition to the L&T Branch has started (well the shell has been complete for quite awhile...) and in two days is actually almost completed.
This structure is associated with the Appliance Manufacturing Plant and will be used as a warehouse for storing raw goods and materials for the various sections of the plant.  It will mainly be served by boxcars with the odd flat car load with a special freight such as machinery or large machine parts.
The kit is a Walther's Back Shop Building Flat and is completely out of the box except for the scratch built styrene concrete floor.  It has been painted with Vallejo Model Air - Sand Yellow, this was my first time using these and I'm really impressed.  Straight into the airbrush and went on really well.
The weathering was accomplished by using Vallejo Model Washes, the colour was Rust.  When this was dried I then applied ready made plaster filler to highlight some of mortar in the brick work.  This was further blended using a extremely thinned down mixture of rust weathering powdered, followed by more dry powdering once dry.
The internal floor has been airbrushed with Polly Scale - Concrete and weathered with Vallejo Model Washes in Dark Brown & Lamp Black.
More to follow shortly.
Jas...