Favourite Photos...

Favourite Photos...
Reading Lines GP35 #3647

Middletown, Pa

Thursday, 2 February 2017

Last of the Plaster/Drywall Backdrops...

The last two days has been spent installing the last of the plaster/drywall backdrops in the Rutherford Yard & Rutherford Workshop areas for the layout.

The product is a 1/4" (6mm) flexible plaster board that can be bent/curved and is perfect for using as backdrops.  To date the original section of the layouts backdrops have not one crack in any of the joins.


The trick to getting perfect joins that don't crack is to back block every one.  The process is fairly straight forward and the only consideration needed is when requiring a hole to be made for trains to pass through you need to add a backing board (usually 1/8"-3mm) made of MDF.

This stops the plaster/drywall from splitting due to the force in the curved section.


Next stage is to mud up the joins with fibre glass tape, one thin coat then dry, followed by a single top coat and dry again with final sand.  Then paint sealer and two coats of the final colour.

Jas...

Tuesday, 31 January 2017

Video of the LokSound - Select Direct decoder install Athearn GP35...

Here is a quick video of the recent install of a ESU - LokSound - Select Direct sound decoder with an ESU Sugar Cube speaker (50321).

The sound is a little loud due the closeness of the iPhone to the locomotive.  It highlights the manual notching of the decoder and the uploaded LokSound EMD 567 sound file.


Next stage will be to play around with the LokProgrammer and get all the settings & sounds right too...

Jas...

Sunday, 29 January 2017

Installing LED's into a Athearn RTR GP35...

As part of the recent upgrade to the LokSound - Select Direct decoders I also wanted to upgrade the bulb lights in the Athearn RTR - RDG GP35.

The LED's are a TCS - Golden White 3mm LED.


The installation is fairly easy and can be done in about 30 minutes to an hour.  First step is to drill out the holes on the cab for the lights.  

The Athearn headlights are slightly bigger than holes for the bulbs, I drill these out with a small thumb drill and ensure the plastic headlights fit.  On this RTR GP35 I had to also drill out the opening in the cab to get the LED through the cabin plastic at the back of the number boards.

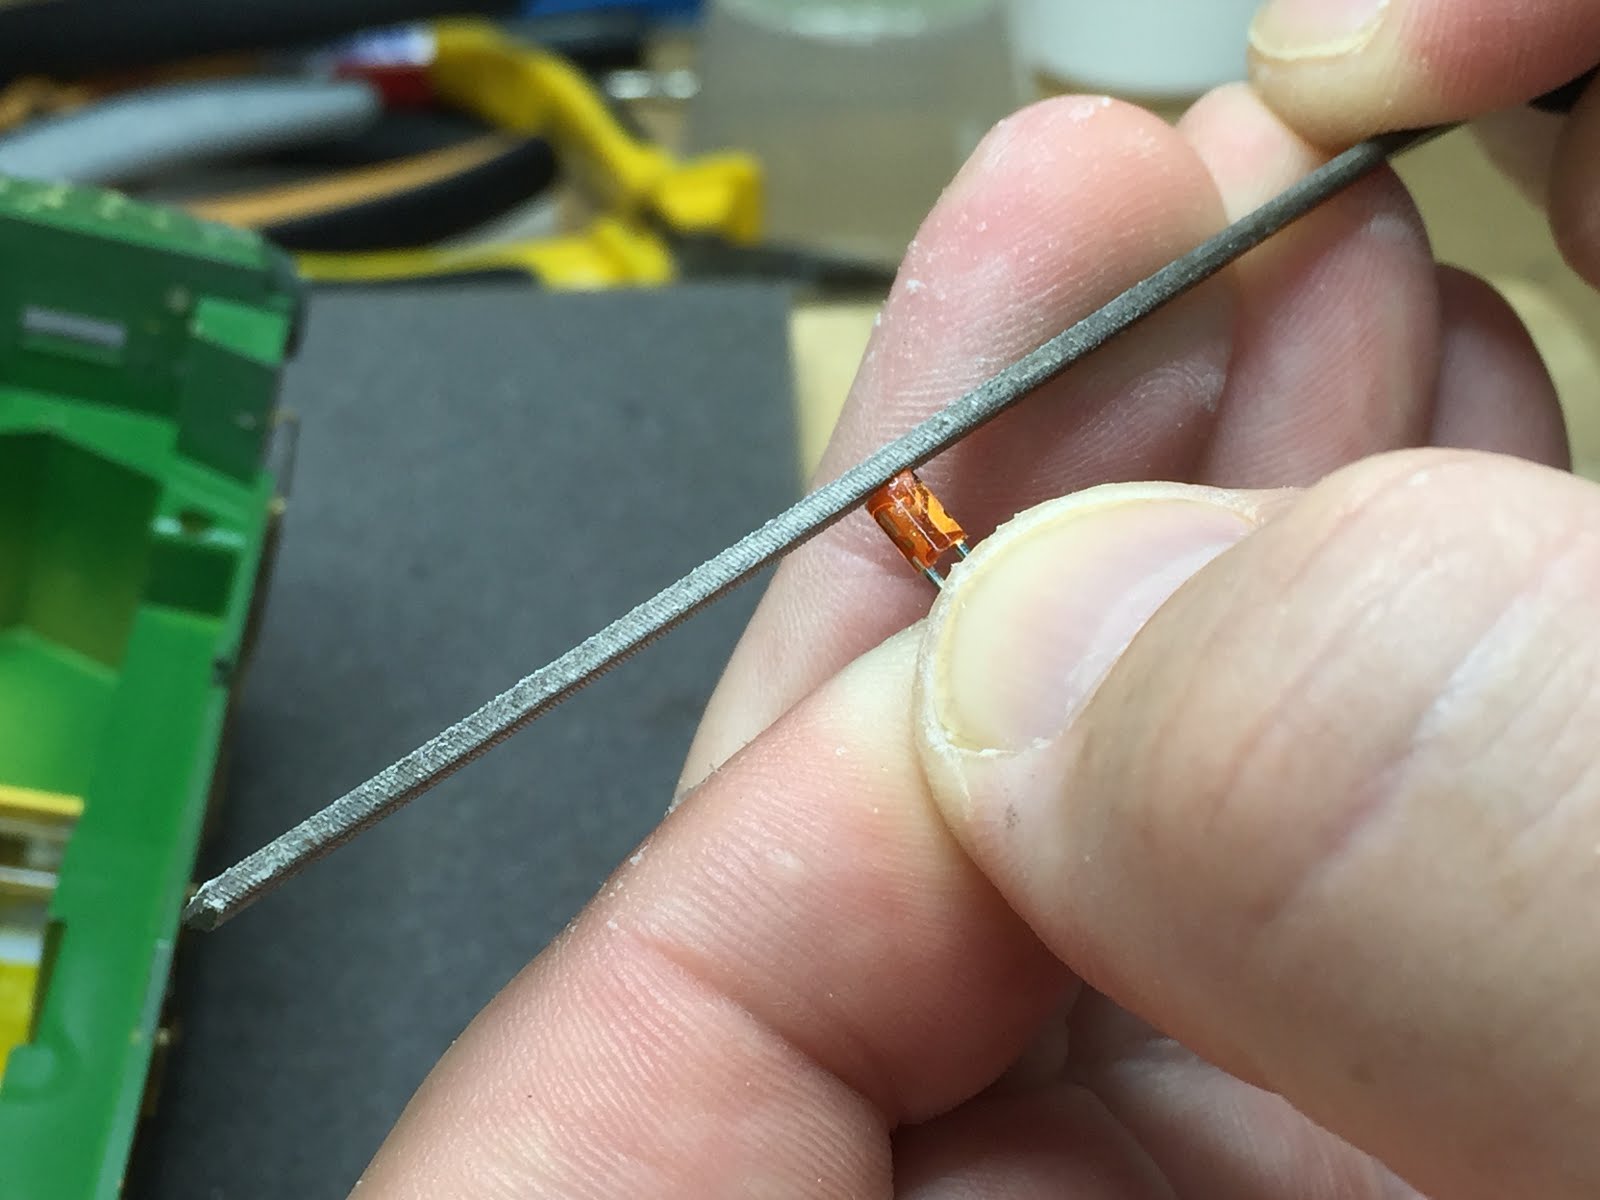
Once the fit is right I file down the Golden White LED.


Then glue the Athearn headlight lenses onto the LED and shorten the anode & cathode leads.  Ensure that headlight lenses are centred over the LED.


Once the CA is cured I place a small piece of heat shrink over the leads.  This stops any shorts and also blocks out any light from the cabin interior.


I then fit the LED and lenses into the cab and secure with a piece of Kapton tape.  


Then test the LED before replacing the cab shell onto the body shell.


The Golden White LED gives of the perfect colour for locomotive headlights.  Be aware though that when using a LokSound - Select Direct decoder like I have you do not require resistors in line as they are installed on the decoder.  If you are using anything else ensure you check if resistors are required.

Thursday, 26 January 2017

Installing my first lot of ESU - LokSound Decoders...

To have a little break from the layout build I decided to start installing my two 
ESU - LokSound - Select Direct decoders.

I originally got these to go into my new Athearn - Genesis RDG GP39-2 locomotives.  I was however a little hesitant to attack two brand new locomotives before trying it on something a little less expensive.

So as a start I have upgraded an Athearn RTR - RDG GP35 & Atlas Silver Series - GP40-2. The Athearn RTR GP35 had already been weathered but I wanted to upgrade the truck power pick ups, replace the Athearn bulbs with LED's and give the motor a good service.


This unit will have one of ESU's Sugar Cube speakers (50321) which is a 15mm x 11mm 8Ohm speaker.  The photo below shows the temporary location for the speaker, it will eventually be stuck inside the shell towards the rear series of fans.


The second unit being the Atlas Silver Series - GP40-2 was a straight forward change out.  After doing the Athearn first which required a few fixes and servicing the Atlas was a easy changeover.  It took around two hours even though I had to cut out sections of the weights and OEM speaker enclosure too.


The Atlas already comes with LED's so the installation of the board and wires was a 30min job.  The only modifications required was to trim down the decoder lugs a little to get the decoder to sit down straight above the motor.

I also had to remove a small section of the Atlas speaker frame to get the decoder into place.


The speaker setup originally installed into this was the same ESU Sugar Cube setup as the GP35.  I however changed my mind and tried out the "closed coupled" ESU sugar cubes by two in the supplied baffle and wired in parallel.  This is an awesome combination in this unit!


The location is still in the same spot even though the size has double.  The photo above shows a much deeper baffle for the single speaker too.  The closed couple set is a little shorter in height to make the fit above decoder better.

Next step is to fine tune the unit with the LokProgammer and post a video too...

Jas...

Sunday, 22 January 2017

Power Districts, BDL168's, PSX-AR & PSX-1 Locations...

At our last Ops Session we noticed that Rutherford Yard was tripping the entire layout (through the DCC Command Station) via the common rail.

Fairly easy to fix that section but I also noticed the problem was going to exist on other parts of the layout too.  So last night and today I have been tweaking our layout schematic with the locations of the BDL168's and the future locations of the PSX-1's that I will use to protect the various areas of the layout.

There is nothing worse during an Ops Session than having one short take out multiple sections or worse the entire layout.  Therefore as I'm beginning to have more structured & formal operating sessions this has become the priority to fix...

Below is the first draft of the wiring and the individual power districts along with the PSX-AR's & PSX-1's.


Jas...

Sunday, 8 January 2017

Progress on the track work alterations...

Last night I continued on with replacing the troublesome Walthers - Shinohara turnouts.  The next section was the mainline coming out of Harrisburg into Lebanon.

When finished the I had removed four Shinohara turnouts and replaced them with one PECO - Code 83 #7 Curved turnout this replaced a crossover that again was not required.

Below is the existing track work with the Shinohara crossover in place...


The PECO turnouts fitted quite well and was virtually in the same place as the longest radius Shinohara.  The added advantage is the the smallest radius for the #7 Curved PECO is still 28", I suspect that the outside is something around 32 - 36" mark.


I also managed to realign a few of the curves coming from Harrisburg into the new PECO turnout, this has made the curves flow much better and also centred the spacings between the other tracks/sidings.


One of the offshoot advantages of re-justifiying the turnouts & crossovers and replacing them with just one turnout is that I now have spare detection blocks to use in other areas (I had maxed out my BDL's) also the flow is much better and operations will benefit greatly from this exercise.

Jas...

Saturday, 7 January 2017

Fixing a persistent track work problem...

This week I have been fixing a persistent problem that has been bugging the layout for around the last twelve months.

When I originally did the track work for the layout I used a combination of PECO Code 83 track & turnouts and Walther's Shinohara Code 83 turnouts.  The build quality between the two is quite obvious when comparing the two.

For the first three to four years the Shinohara turnouts have been fine.  I had to adjust a couple of the point ends on a couple but apart from that there were no issues.  But over the last twelve months they have required regular maintenance and tweaking to keep the point closed against the rail even under Tortoise switch machine tension.

After our last ops session it was also noted that several of the turnouts were in fact out of gauge by at least 1 - 2mm on several of them.  So I have decided to replace them all with PECO - Code 83 #7 LH & RH Curved Turnouts.

This has also allowed me to do another turnout & crossover justification for the existing track work.  As the original operating plan and track work has changed since going down the switching layout path I have removed several turnouts & crossovers too.

First job was to remove the crossover coming into Rutherford.  As there is a crossover in Rutherford itself the Shinohara crossover was removed and replaced with track only...


On the other side of the backdrop (to the left of photo) was another two Walthers - Shinohara Turnouts, these have also been removed...


The top set of Shinohara turnouts (crossover) was a constant source of maintenance & tweaking throughout the year.

With the removal of the turnouts coming into Harrisburg this required a chance to clean up and realign the track work and turnouts.  The photo below shows the newly installed PECO #7 Curved turnout coming into a #8 RH turnout which is also Code 83 PECO too.


When looking from the other direction the flow of track has been improved greatly and it has also removed the excess curve that was there from using the original Shinohara turnouts as can be seen by the existing cork road bed to the right of the track.


To finish off I also removed a slight hump that existed from the mainline coming from Carlisle Junction (from the left) to the right into Rutherford right underneath the backdrop, the transition is now a perfect grade into level with no more hump.


Next step is to work my way around the remainder of the layout and replace all of the Shinohara turnouts.

Jas...

Wednesday, 21 December 2016

Christmas has come a little early...

This year Christmas has come a little early for our layout.

Two shiny new Athearn - Genesis RDG GP39-2's, a LokSound Programmer and two LokSound - Select Direct - sound decoders to go into the GP39-2's.


So my spare time over the Christmas holidays has now been planned and will be spent doing decoder & speaker installs and also learning and programming with the LokSound Programmer.

Merry Christmas & have a Safe & Happy New Year to all of my friends and blog followers...

Jas.

Saturday, 17 December 2016

Harrisburg West - Interlocking...

Over the last two days I have been working on completing the Harrisburg West - Interlocking  Signal Bridge and dwarf signals.


This set protects all the westbound traffic from Harrisburg into Lebanon.  The triple head mast protects the main (Track 1) and the double head mast protects the passing siding (Track 2) located on the signal bridge.

The double head dwarf protects the Industrial Track (Track 3) & the single head dwarf protects the other Industrial Track (Track 4).  I could have added more masts to the bridge but to be honest they get overly crowded with wires when there is anymore than two.


Again extremely impressed with he colours of the RR-CirKits Tri-Coloured LED's...

Next phase will be to finish the next interlocking a Lebanon and begin to program in the logic into JMRI.


Saturday, 10 December 2016

Harrisburg West - Signal Bridge...

Yesterday was again another day of wiring up trip-coloured LED's and constructing the bracket masts for the Harrisburg - West signal bridge.

This signal bridge sits on the outbound sound of Harrisburg heading towards Lebanon.  It protects the interlocking section for westbound trains into Lebanon on the main, and also westbound trains from Track 2 in Harrisburg as it re-enters the main just before Lebanon.

It has a three (3) head mast to protect the westbound main, and a two (2) head mast to protect the westbound passing siding (Track 2).

This signal bridge is the first one to completely use the IHC plastic kit heads & bridge.

Below was the last mast that needed to go on the signal bridge.  I know have the process down to produce a mast with multiple heads, the IHC plastic kit has worked out to be a great asset.


The below photo shows both mast attached to the signal bridge.  The triple head has had the wiring run through the conduit and fed down through the frame work ready to be wired up under the layout.  The two head mast is still waiting for all the wiring to be run through the bridge frame work.


Close up shot below of the two head mast.


More after I have finished off the wiring and installed onto the layout & programmed.

Jas...

Thursday, 8 December 2016

Another Signal Bridge after holidays...

So after returning from a week of family holidays from this (this was the view from our holiday house) and the warm weather...


It's back into building more signal bridges & signal masts...

Still using the IHC Plastic kits with he searchlights at this stage.  First installation is a triple head mast.  I had to test fit the twelve (12) wires into the styrene tube first to make sure I could feed the all through.


Next step was to glue in place and ensure it remained plumb while the glue setup.  I would normally give it a hit with some instant set but it has seemed to have gone off and doesn't work.


To ensure the mast was plumb to the signal bridge framework I used a square to check...

Tomorrow I will make up a double head mast and attach that along with feeding the wires through and connecting to the SE8C board.

Jas...

Friday, 18 November 2016

Steel Mill Track Work installed and ready for wiring...

So yesterday I finished off the track work for the Steel Mill and Harrisburg Industrial Area.

Next stage will be to install the feeders for the track work power and the tortoise motors for the crossover.


The whole scene is now starting to come together nicely.  Once the power feeders are in place and the track work is ok, it will be time to get the operating crew back again to test it all out.

Jas...

Tuesday, 8 November 2016

Harrisburg - Steel Mill & Industrial Area - Track Work...

So yesterday was a day of installing the track work associated with the new Steel Mill and the remaining Harrisburg Industrial area.

First was the siding for the Electric Furnace, this will hold two 52' gondolas or a larger single 65' one.  I wanted a second siding but couldn't get the room to add it, it will make the operations side of switching more interesting having to shuttle two in, and two out spotted on another siding.


The remaining track work was associated with the siding that feeds the Mill area and the remaining industrial area of Harrisburg.  This included another siding for a larger industry, and two separate storage/spotting tracks to allow switching to continue in the area.


There is also a crossover from the main to the siding to allow run-around moves to be performed.

As can be seen in the above photos the plastic base for the rolling mill has the rail pre-formed into the base itself.  To allow the movement of the coil cars & gondola's there will be an idler car (50' flat car) that will be used so that the switcher does not have to enter the unpowered base area of the rolling mill.


This is overall shot of the Harrisburg Industrial Area...


More soon...

Sunday, 6 November 2016

Harrisburg - Steel Mill...

So this week another shipment of railroad goodies arrived from my good friend in the USA (he ships over all my eBay purchases) filled with the last lot of structures needed for the Harrisburg - Steel Mill area.

To move forward with the Steel Mill area I needed the structure kits so that I could place the physical base plates on the layout to see if the track work would work and also if it fit with the location too.

First kit was the Walthers - Electric Furnace kit.  I made up the base plates and steel framework section to check the location of the kit on the layout and also check the overall size and how looked on the section of layout it was earmarked for.


This kit is huge and makes a great view block, it is going to be located at the the entrance (on the left) to the main section of the layout.  It will have one unloading track fed from a siding and one ingot loading track that will run through the rolling mill.


Another shot looking down from the Harrisburg Industrial area towards the steel mill.


More soon as I work on the remaining kits and placement...

Thursday, 20 October 2016

Harrisburg Industrial Area - Alterations...

So today was one of those days that had a few things to be done, and not a lot of spare time to get stuck into anything substantial on the layout.

I managed to build another IHC plastic Signal Bridge in readiness for the next one to take shape.  Whilst positioning the signal bridge I was mulling over the Harrisburg Industrial Area and how I was going to best use  the space and thinking about how to operate it.

Some of my moments and best ideas come about sitting and looking at the layout while having a cuppa, and trying to think about how to operate an area.

Today turned into one of those days.  I recently obtained a Walther's - HO Electric Furnace kit after much searching along with a Walther's - HO Rolling Mill kit too.


These two structures will represent my portion of the steel industry that formed part of Harrisburg's golden railroad years.  This section is a recycling site attached to the greater steel mill which on our layout will be a photo backdrop of the real thing.

The area that these two kits will be placed is on the left of the main entrance to the bigger section of the layout.  This will add some serious bulk to the entrance of the layout and will hopefully give some real industrial grime and mass to the area.


This section has now worked out better than the old arrangement as reach in is no longer an issue for operators due to all the industries and trackwork being relatively close to the aisle and fascia too.  I have also managed to get some storage track for possible one or two spots as well which is always a bonus.


It will also allow me to have a city/commercial area in the next section along that would have created reach in issues for operators.  I always some city area to model as well so that the layout had an even balance of believability.

Next phase will be getting the turnouts and track work altered and re-installed.

Jas...

Wednesday, 19 October 2016

First Signal Bridge complete...

Yesterday I finished off the first of our layout signal bridges.  The Harrisburg - East bridge has two triple head masts.

These masts are Tomar - Triple heads that have been converted to fit the IHC Plastic signal bridge kit.  They are also fitted with RR-CirKits Tri-Coloured LED's as the searchlights.

The installation is fairly straight forward but extremely time consuming, these two masts devoured the better part of full two days to install the LED's and feeding the wires through the bridge/conduit and wiring up.

Below masts from left to right:  Stop & Approach Medium...


The second mast (the left one above) went much better with the wiring install as I was able to feed the wires into the mast a lot more cleanly that the first effort (mast on the right).  This was mainly to do with the difference between the wires used.

These masts and the trip coloured LED's are perfect, they can be seen from some distance easily and the colours are easily distinguishable from one another too.


Once the next bridge is in place it will be time to program the two and then onto detailing them at a later date.

Jas...

Saturday, 15 October 2016

More signal masts being produced...

Well I have had a few busy weeks with work and not much time dedicated to layout at all.

So the last two days I have spent building more signal masts for the layout signal bridges.  It's time consuming but in a weird way I find it relaxing, when things run smoothly of course.

Recently I had a big win and found some old IHC plastic signal head kits, along with the corresponding signal bridge kits too.  The bridge kits are in fact the old watering bridge kit that IHC made but it is the exact same mould that was used for the signal bridge too.

So I have completed my first IHC plastic signal mast for one of the signal bridges.


These kits are very easy to make and very adaptable too, they are perfect for the tiny 1/8" (3mm) Tri-Coloured LED's that I am using as there are no issues with shorts on brass and they are just glued together.

The detail is not quite as good as the Tomar kits that I have previously used and the wires cannot be run in the brass tube so they are exposed.  But neatly bundled and secured to the mast and once painted black they will be barely visible.


Many, many more of these to be built......